How to Start an Improv Quilt with One Shape and Simple Rhythm
Repeating a simple shape doesn’t mean boring! These gentle, freehand-cut curves create a dynamic final composition (plus they were so much fun to make and arrange!).
Over the past few weeks on the blog, I’ve been exploring the role of structure and simplicity in improv quilting, thinking about how narrowing your focus can actually make it easier to get started.
Improv can begin with a flood of ideas. But it doesn’t have to. Either way it’s still improv.
Personally, I’ve found that beginning with something simple often works best for me. By simplifying the possibilities in play, it helps me shape not just the quilt, but my creative process itself. It anchors the experience with intention and invites me to play and respond as I sew.
I’m not advocating that you need a precise plan to follow. But having a rough plan can help get things moving. And by plan, I mean something as simple as choosing one shape and deciding to build your quilt top row by row. That alone gives you a foundation for something meaningful.
With that sketch of a plan in mind, today I want to add one more tool to the mix: rhythm.
Rhythm can be loud. It can be bold. It can show up in variation or in unwavering repetition. But it can also be quieter and more intuitive, a kind of subtle pulse that builds naturally as you make decisions. And I’ve found that aiming for that kind of subtlety can help things start to flow.
Repeating the same shape across your quilt, with gentle variation, is a great way to begin exploring freehand cutting and build confidence through practice. Even a mini quilt or wall hanging is a perfect place to start. It’s rhythm in its simplest form and a powerful creative tool.
Let’s take a closer look at how rhythm, especially in row-based layouts, can guide your design decisions and help you build momentum in your improv quilting journey.
Structure Without Rules

Don’t feel limited to shapes that look like stripes. Traditional stripes are great, but rows of checkerboards, gentle curves, or even quarter-circle stacks can all create rhythm too.
Rows create a natural visual flow. Side to side, top to bottom, they mirror the way we read, scan, and process information. You’re doing it right now as you move through this blog post. That built-in direction makes row-based layouts especially helpful if you’re new to improv quilting.
There’s comfort in that structure. It gives your quilt a sense of order without locking you into a rigid plan. Your eye naturally wants to move across the quilt row by row. It has already been trained to intuitively understand how a row has rhythm and how to spot a change in pace or an outlier.
You don’t have to figure out a whole new composition or structure. You already know it. Instead, you can focus your energy on just the next shape, or the next stretch of a row, and let the design unfold step by step.
This kind of rhythm is steady but flexible. It keeps you grounded while still making space for variation, experimentation, and creative surprises within the comfort of a structure you know well. And when you’re not worrying about the overall layout yet, it becomes easier to notice the details, how shape, color, or spacing shift the energy within each row.
That’s the beauty of row-based improv. It offers structure without being stifling. Direction without pressure. And for many quilters, especially when they are just starting to explore quilting without a pattern, that can make all the difference.
Why Sticking with One Shape Is Key

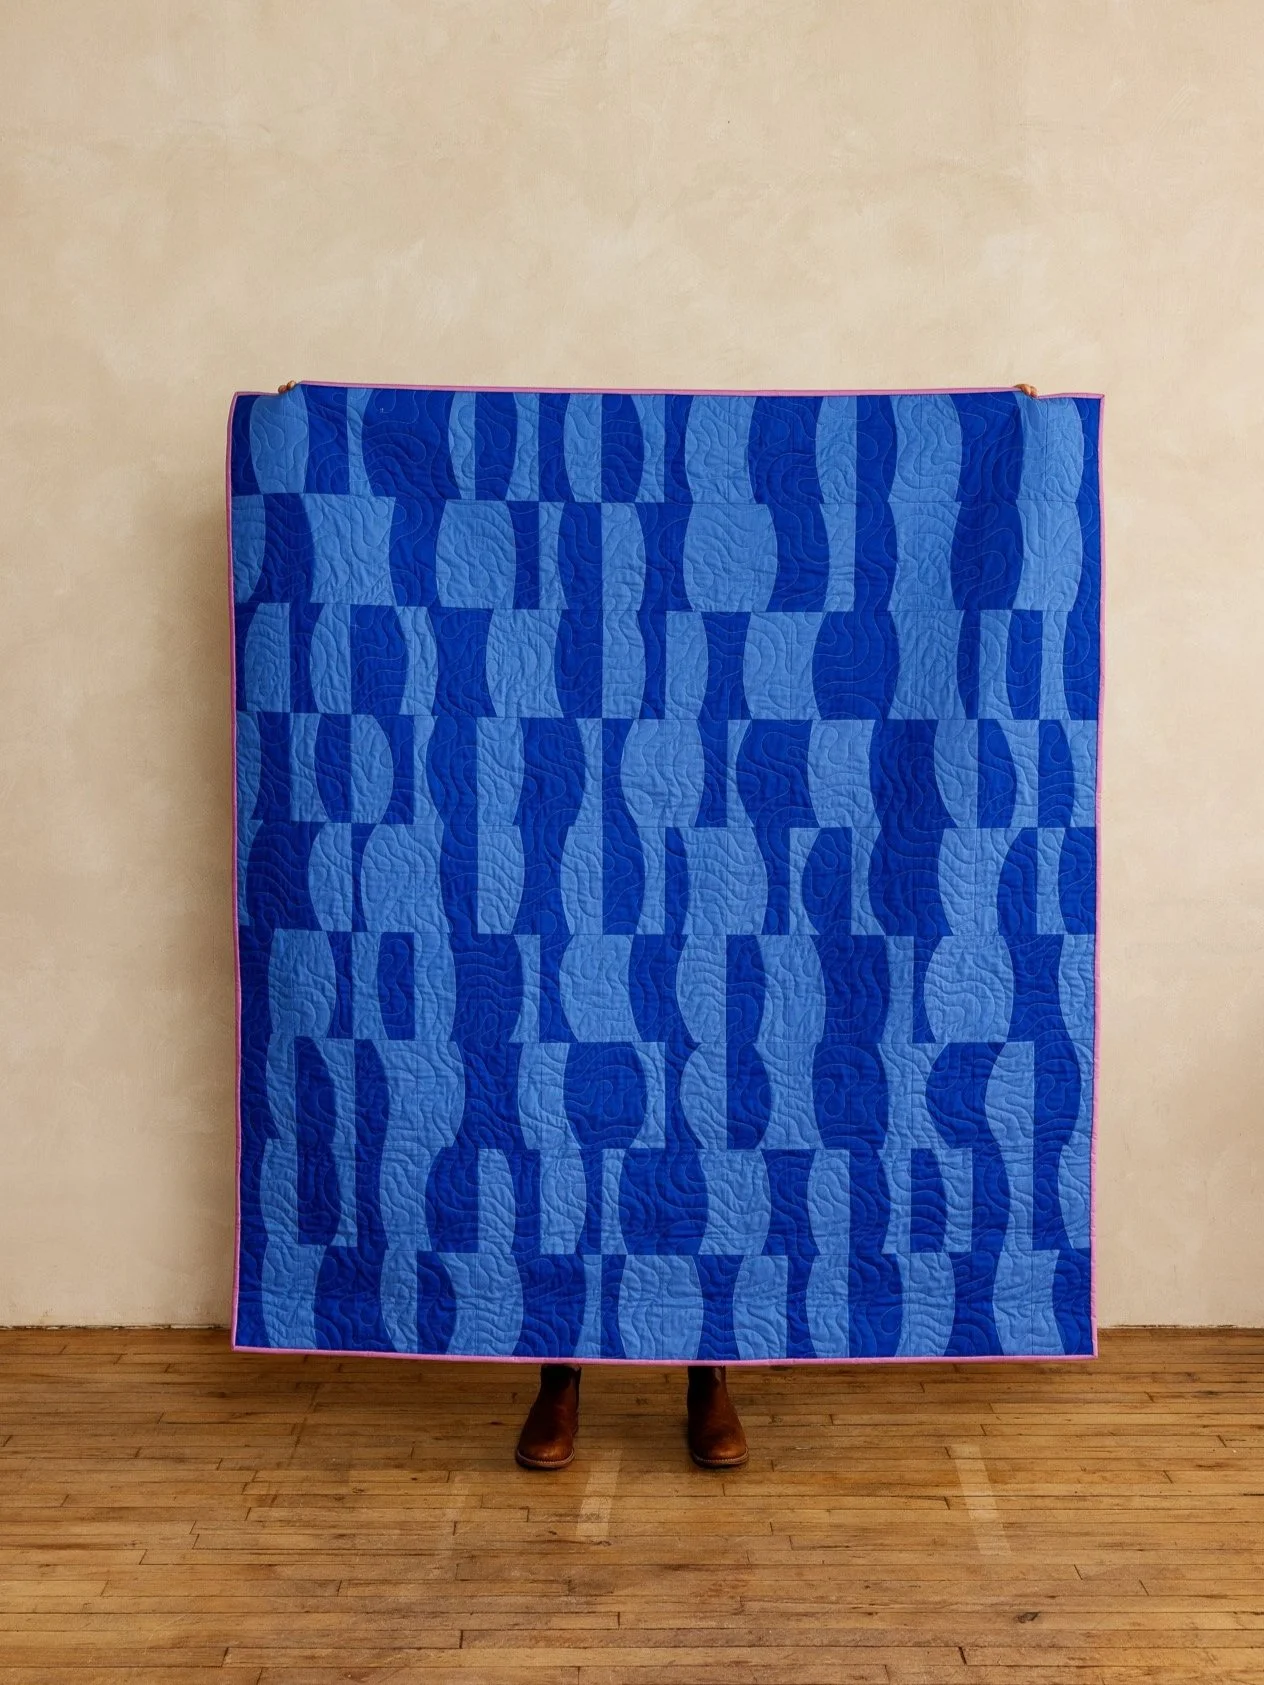
Rhythm can come from a single shape or patchwork motif. In this quilt, I used two corner triangles in each rectangle block to create a quiet sense of consistency.
You might be thinking, okay Amanda, if this structure is so safe and comfortable, why limit myself to just one shape?
Well, of course you don’t have to. But the beauty of sticking with a single shape (whether it’s rectangles, stripes, or something more organic) is that it reduces decision fatigue. Instead of wondering what to add next, you’re free to explore contrast, color, and scale within a familiar form.
When you’re new to improv quilting, that kind of constraint can be a gift. With so many moving parts (new ideas, new techniques, unexpected results) having some guardrails can keep things playful instead of overwhelming.
And remember, starting with one shape doesn’t mean you have to stay there.
Improv quilting is all about reacting to what you’re making. It’s a conversation with the work as it unfolds. Want to add a triangle to your striped composition? Go for it. Add five, or twenty. Just make sure to pause as you go, take a step back, and ask yourself: how does this flow?
Tip: Not sure if a new shape belongs? Try cutting it out of paper and pinning it to your design wall. Take a photo and switch it to greyscale to see how the new line shifts the composition before committing to it in fabric.
A Simple Step-by-Step Way to Start
If you’re not sure where to begin, here’s a simple, beginner-friendly way to start an improv quilt without a pattern:
1. Choose a general quilt size.
A crib size quilt or a wall hanging is a great starting point. You don’t have to be exact, but having a rough size in mind gives your project direction. Sketch it out (a simple rectangle with roughly the same proportions will do the trick).
2. Pick a row height.
Consistent rows make improv quilting easier. Try a row height of 6 or 8 inches to start. Keeping your blocks the same height can help make it easier to line up everything later. Not sure what height will work within you canvas: try filling in that sketch from Step 1 with different row heights to see how it could look.
3. Choose one shape.
Start simple. Work with rectangles, stripes, or another shape that feels intuitive to you (or one that you’ve been wanting to practice — you’ll have lots of opportunities to make the same shape over and over here!). Limiting your shape keeps the focus on color, contrast, and flow.
4. Make a handful of blocks.
Start by using just one shape per block. This keeps things simple and helps you focus on scale, color, and placement. Make enough blocks to fill one row, keeping the height consistent and letting the widths vary as needed to fill out the row or as you want to experiment.
5. Lay out your first row.
Arrange your blocks side by side. Play with spacing, scale, and repetition. Then move on to the next row, building momentum as you go.
6. Repeat and respond.
Add more rows, one at a time. Stay open to change. Small shifts in shape or color will start to create rhythm naturally.
How Rhythm Takes Shape

Even something as simple as these scrappy dashes can bring rhythm to a piece. The imperfections (in spacing, alignment, and size) add an extra dose of energy to an otherwise minimalist composition.
As the rows build, you may or may not see a clear pattern take shape, and that’s okay.
Instead of searching for traditional repetition, start paying attention to rhythm. Let your eyes dance across the piece. Notice where they rest, where they jump, where they get stuck, and where they naturally track along.
Are there shapes with similar widths or visual weight that help anchor the composition? Can you group a few blocks with a shared quality to create a gentle pulse?
When I work in rows, I’m not aiming for rhythmic perfection. I’m paying attention to pacing:
Where does the eye move quickly?
Where does it pause?
Which shapes echo each other?
Which ones break the pattern?
That’s rhythm.
Even when working with just one shape, you can create a rich visual experience by:
Varying the width or spacing of each block
Using a consistent row height to create cohesion
Repeating a fabric or motif every few blocks to establish a pulse
Letting one unexpected moment break the repetition to reset the flow
You’re not following a formula, you’re creating a journey for the eyes, across and within your quilt. Whether through balance or imbalance, you are crafting an ongoing visual dance.
Step back from your work often. View it through a camera, switch to greyscale, or rotate your phone to see it upside down. Shifting your perspective helps reveal rhythms, surprises, and new ideas that aren’t always obvious up close.
Before You Begin
Remember, you don’t need to have it all figured out when you start. Start with one shape. Then make one row. Add in a few quiet variations. That’s enough to get started. And by starting you’ll be making something to respond to, and that is the key.
As you build, you’ll begin to find your rhythm. Maybe not in a perfect pattern, but in a flow that feels intuitive and personal. The beauty of improv quilting is that it invites you to keep responding, to stay curious, and to trust that something meaningful will emerge.
And if you want to explore these ideas before you cut into fabric, that’s always an option too. Try sketching, collage, or arranging paper cutouts on a design wall. You can build rhythm with paper just as easily as with fabric, and sometimes that extra space to experiment is exactly what you need to move forward with confidence.
Want to Explore Rhythm & Rows Further?

Let each row set the rhythm.
Rhythm & Rows is all about flow. This horizontal improv framework helps you create balance, movement, and variation—one row at a time. It’s ideal for quilters who love exploring subtle shifts and strong motifs within a clean, linear layout.
Whether you’re aiming for calm and cohesive or bold and graphic, this playbook gives you the rhythm to improvise with intention.
Why You'll Love It
A row-by-row approach: Focus on one visual idea at a time, then let your quilt build organically
Prompts for flow and repetition: Learn how to develop rhythm and variation across rows
Flexible row formats:Use sketching prompts to experiment with layout flow and block variation
Build with clarity: Freehand cutting video demos support your construction every step of the way
Details
Instant download PDF
Skill level: Advanced Beginner to Easy Intermediate
Standard American terms and measurements
Includes access to companion video tutorials
Includes three layout options for a Throw Sized quilt (54” x 60”)
© 2025 Broadcloth Studio. All Rights reserved. Resell of finished product with pattern credit allowed.
If this approach (starting with one shape, working row by row, and letting rhythm guide your next steps) to improv quilting resonates, the Rhythm & Rows Playbook offers a deeper way to explore.
Inside, you’ll find:
Simple layout frameworks to help you get started
Prompts for experimenting with contrast, pacing, and flow
Sketching and collage exercises to test ideas before cutting fabric
Visual rhythm strategies to help you shape and evolve your design
Video demos showing how to freehand cut a variety of shapes with confidence
Whether you’re new to improv quilting or looking to bring more intention into your practice, the Playbook offers just enough structure to move forward—and plenty of freedom to make it your own.
You May Also Enjoy These Quilting Tips and Guides: