How to Calculate and Assemble Your Quilt Backing Fabric
I love making throw quilts! The only thing that annoys me about them is assembling the backing fabric. They’re too big to fit onto one width-of-fabric (WOF) piece of fabric and too small to justify two WOF size pieces sewn along the selvage (it drives me bananas having to trim off so much!). Sometimes I get around this by piecing together fabric odds and ends I’ve got lying about to create a scrappy #partyinthequiltback, but other times I want the look of a single fabric on the back.
In order to get that single fabric “look” here is how I calculate the yardage I’ll need and how I assemble my backing fabric step-by-step.
1. Determine the size of your quilt back
Measure the width (W) and height (H) of your quilt top. To account for the necessary overage you’ll need in case the quilt shifts while quilting or if you are working with a longarm quilter, add 8” to both the height and the width to get your quilt back measurements (note: some longarm quilters require specific amounts of overage, so make sure to check with them and update the 8” as necessary).
Quilt Back Dimensions: (Quilt Top Width + 8”) x (Quilt Top Height + 8”)
2. Map out how many pieces of fabric you’ll need
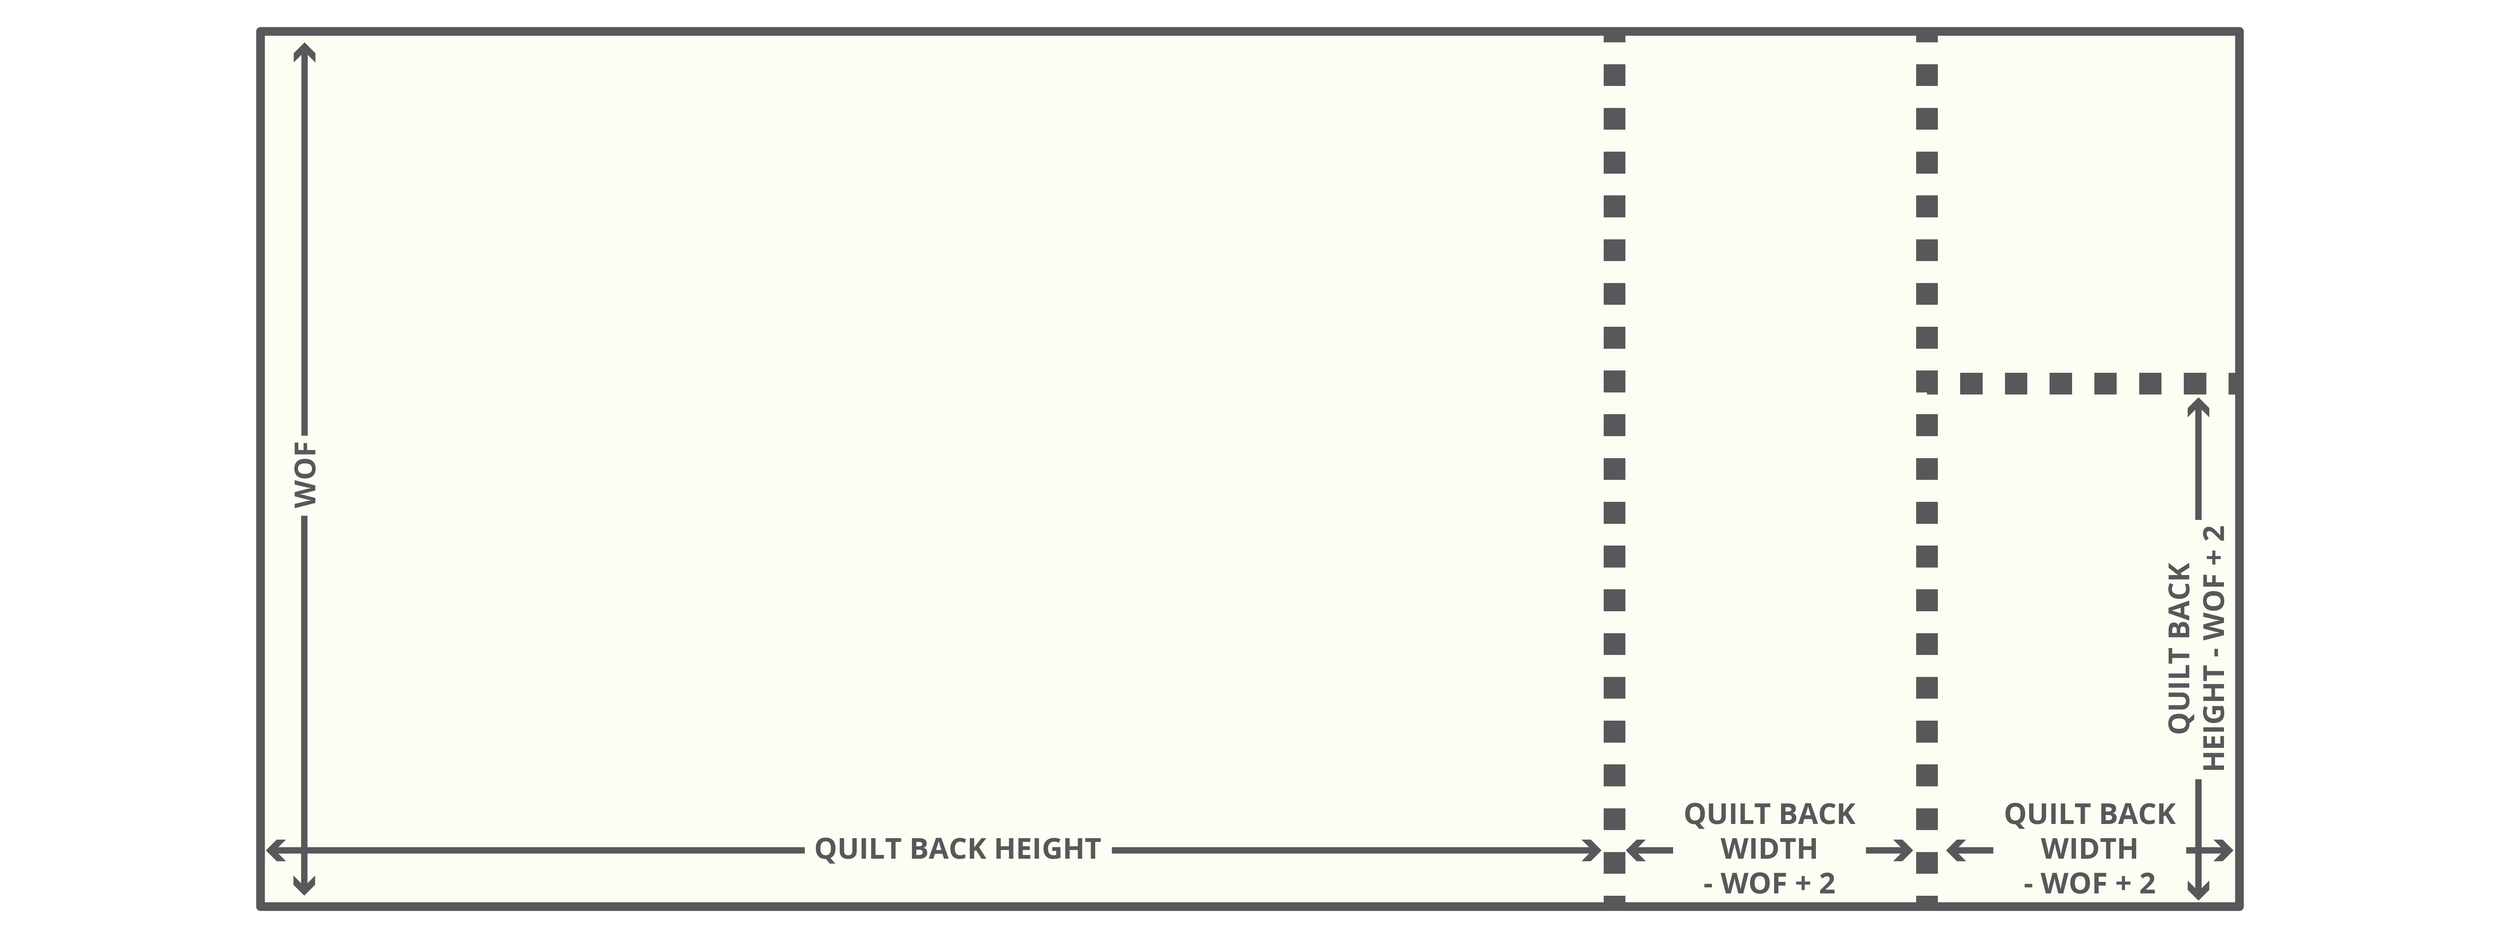
You’ll need three different sized pieces of fabric for your quilt back:
Piece 1: WOF x (Quilt Back Height)
Piece 2: (Quilt Back Width - WOF + 2”) x WOF
Piece 3: (Quilt Back Width - WOF + 2”) x (Quilt Back Height - WOF + 2”)
To be honest, I never remember the exact formulas (even though they’re super straightforward), plus I think it’s quicker to sketch this out especially as I like to visually know where I’m going when it comes time to assemble. Here’s how I map it all out with on a piece of scrap paper and pencil:
Sketch out a your quilt back and roughly draw a line to illustrate how much a WOF piece of fabric will “fill” in of the width
Calculate how much of the quilt back width remains ( (Quilt Back Width) - WOF)
Draw a line to illustrate how much WOF will get you for the height of this second column of fabric
You’ll end up with a small rectangle in the corner of your Quilt Back: you’ve already got the width of this piece ((Quilt Back Width) - WOF) so all you need to do is figure out the height by subtracting the WOF from your Quilt Back Height ((Quilt Back Height) - WOF)


Now you know the dimensions of the three pieces! The very last step is to factor in seam allowance. Since WOF is established, I typically add in 1-2” to calculated width and height of the smaller column of fabric to account for any decorative selvages and the ½” seam allowance I like to use when quilting my quilt backs.
To recap, the dimensions of your pieces will be:
Piece 1: WOF x (Quilt Back Height)
Piece 2: (Quilt Back Width - WOF + 2”) x WOF
Piece 3: (Quilt Back Width - WOF + 2”) x (Quilt Back Height - WOF + 2”)
3. Calculate how much fabric you’ll need
Using the dimensions from Step 2, here’s how I calculate the yardage I’ll need (just round up to the nearest quarter, eighth, or third of a yard as necessary):
Yardage = (Quilt Back Height + 2*(Quilt Back Width - WOF + 2”))/36
Again, I think it’s easiest to just sketch this out, tally up how many inches it is, and divide by 36 to get the yardage required for your quilt back, like so:
To recap, here’s how to calculate how much yardage you’ll need for your quilt back:
Yardage = (Quilt Back Height + 2*(Quilt Back Width - WOF + 2”))/36
4. Cut your fabric to size
Using your handy map from Step 3 as a cutting diagram, cut your WOF pieces out. I like to sew Piece 2 and Piece 3 together along their short end (trimming selvages and using a ½-inch seam allowance), sew it to the long edge of Piece 1, and THEN trim Piece 3 down to size, but if you want to cut out all your pieces first, go for it!
5. Assemble your quilt back
If you’ve been sketching everything out, you already have a diagram to follow when it comes time to sew! To start, sew Piece 2 to Piece 3, press your seam to the side. Take this narrow fabric column and sew it to Piece 1, pressing your seam to the side away from Piece 2 and Piece 3. Give it all one final iron before you baste your quilt.
Note: When assembling my quilt back, I like to use ½-inch seam allowance as that was how I was taught, and I find the wider seams always stay nice and flat when basting. You can also use a 1/4-inch seam allowance, it’s just something to keep in mind and to experiment with.
What about larger size quilts?
You may be asking at what point should you just use two WOF x (Height of Quilt Back) sized pieces? Anything around 74” or wider if you’re working with a 42” wide fabric (74” + 8” = 82” which if you divide by 2 is 41”: the extra inch on either WOF piece of fabric allows for ½” seam allowance and any necessary trimming for the selvage. That being said, to play it safe, I always like to sketch it out first :)
And when don’t you need any extra quilt back piecing? Well. if you aren’t particular about the pattern direction of your fabric, then any time one of the quilt’s sides is less than the WOF minus 8” it will allow you to get away with working within the WOF (if I’m machine quilting it myself, sometimes I reduce the overhang: depends how daring I feel!).
When You’re in the Mood for Fun, Not Math…
Looking for a more playful approach to quilt backs? Skip the calculations and dive into colorful, creative layouts with my 10 Ideas for a Fun & Fabulous Scrappy Patchwork Quilt Back. It’s packed with easy, mix-and-match designs that make the back just as exciting as the front — no measuring marathon required.
You May Also Enjoy These Quilting Tips and Guides: