

How to Make a Plaid Wholecloth Quilt
I love plaid. Growing up in New England, fall meant the return of apple cider, pumpkin everything, and, most importantly, my plaid flannel shirt collection. So what could be better than an easy-peasy plaid wholecloth quilt?
The Challenge
I love a good wholecloth quilt. Removing the patchwork element from the picture allows the pattern of the quilting to take center stage: there is no fear that the patchwork and quilting are going to clash or compete. I’ve only ever made one wholecloth quilt before and I hand quilted the entire thing. It was the perfect side project: once I had all the quilting lines drawn and thread basted the quilt sandwich (my preferred method of basting for any hand quilting project), I would periodically pick it up and stitch a little at a time, and soon enough, I had a completed quilt top!
So, when Aurifil announced that its Artisan September challenge was a wholecloth quilt, I signed up without a second thought.
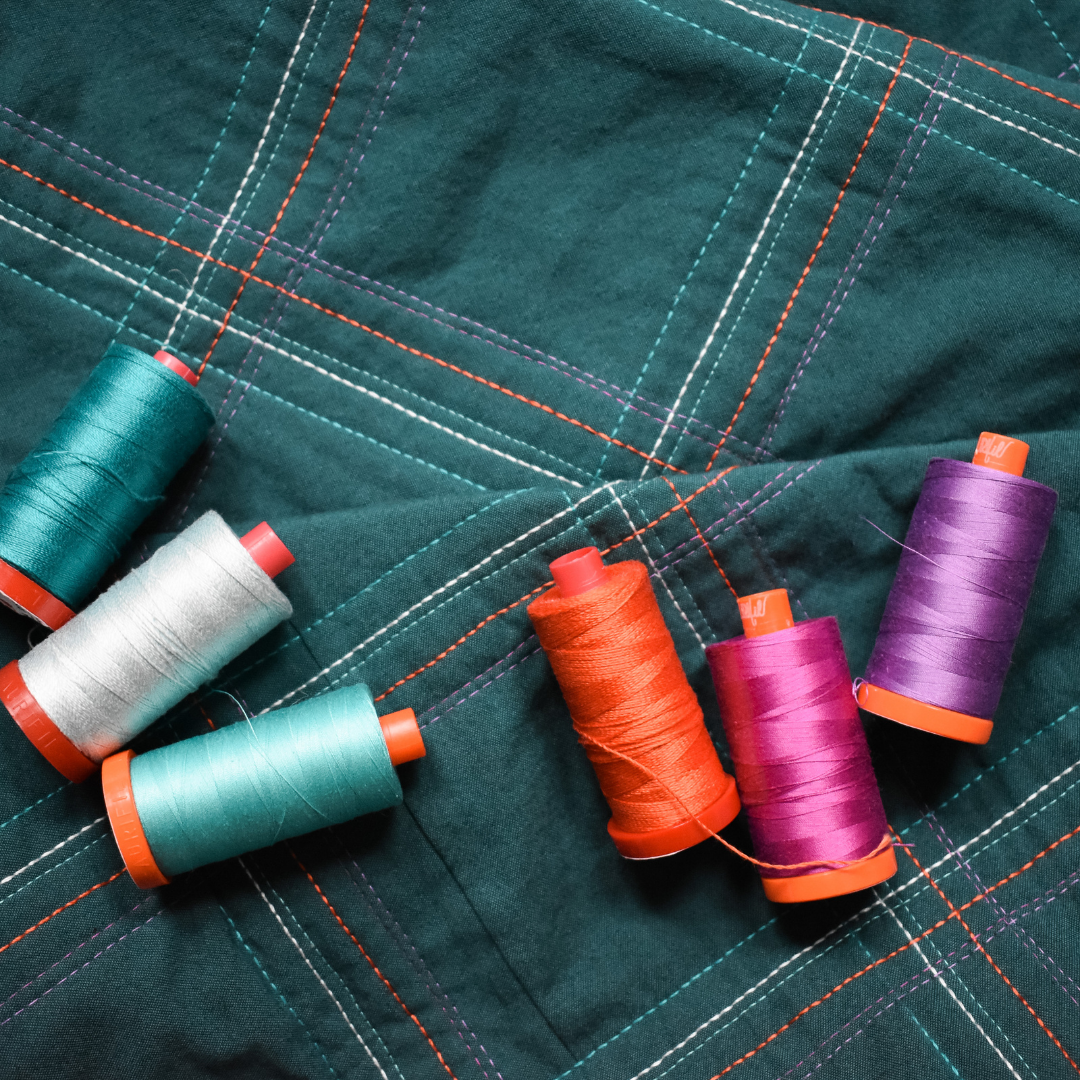
Materials
For this challenge, Aurifil teamed up with Windham Fabrics and we got to take their Artisan Cottons for a whirl: they’re a beautiful cross-dyed quilting weight cotton (aka they’ve rocking some super saturated color!). I picked this gorgeous dark blue-green beauty to work with, because I thought it would provide a beautiful backdrop for the stitching!

In addition to the Artisan Cotton fabric for the quilt top, I dove into my stash and grabbed a mix of yardage, fat quarters, and big scraps to piece my quilt back together: I knew I wanted to provide a nice juxtaposition to the clean front, and thought a jumbled back would be just the ticket.
Step 1: Gather Inspiration
Before we go any further, I have a confession to make: I am not the strongest of machine quilters. And while we’re being honest, I don’t really enjoy the process too much (it’s a hard sell to me, especially because I absolutely adore hand quilting). But, after looking at my calendar for the month, I soon came to the realization that I simply wouldn’t have time to finish an entire hand quilted wholecloth quilt. With a (slightly) heavy heart, I realized I would have to machine quilt it. So, what pattern to do without driving myself crazy? And, how could I minimize the potential for headaches, frustration, and need for my seam ripper?
The answer? Plaid.
I love plaid. Growing up in New England, fall meant the return of apple cider, pumpkin everything, and, most importantly, my plaid flannel shirt collection. Since this project just so happened to coincide with the beginning of fall, it felt like fate! So, I wandered on over to Pinterest and started to do some research for different plaid patterns. And I was not disappointed! Check out my inspiration board here.
I took my top four favorite elements and quickly doodled them out to use.
Step 2: Prep the Front & Back
Before diving in, I prepped my quilt front and back. I started with the front, because I knew it would determine how big the back of the quilt top would need to be. I had two yards of the Wyndham Artisan Cotton for the front and decided to use all of it for the front (I figured a fun scrappy binding would be perfect for this project). I decided I wanted a rectangular quilt top: the Artisan Cotton has a 43” WOF, so I made a snip at the 55” mark and tore the fabric in two (why cut when you can more easily tear, I ask!). I took the smaller piece (roughly 17” wide) and tore it in two. I then pieced the two long skinny pieces together, trimmed it down to 55” and sewed it to the long edge of the 55” x WOF piece (I had an extra long scrap of the quilt top fabric leftover which I set aside for making some plaid samples later). And voila: my quilt top!
For my quilt back, I didn’t feel like doing any measuring or math, so I laid the quilt top on the floor and started arranging my mix of yardage, fat quarters, and big scraps on top. I aimed to cover the quilt top with about 6” of overage, but I wasn’t too fussy about it. Once I found a layout I liked, I started sewing the pieces together, rearranging and trimming as necessary until I had a quilt back that covered the quilt top with roughly 4” overage on all sides.
Step 3: Make Samples
I had a little extra of the Wyndham Artisan Cotton leftover from my quilt top. Before committing to an allover pattern, I decided to mock up a couple of plaid pattern samples (because there was no way what I had envisioned would exactly line up with reality after quilting it). I grabbed my doodles and started playing around with my threads to see what worked best!
To be honest, I didn’t love any of them. I had stuck to a very uniform pattern and it felt too flat for me. So I decided that I would play a little more with the spacing between the different thread colors and add in some different thread weights to add a little variation to the overall look..

And the more I looked at them, the less I liked how the bright yellow made the green fabric look so yellow, so I added in some purples and another turquoise to play up the blue tones of the fabric.
In the end, I decided to use the following Aurifil threads:
Cotton 12 wt: 2245, 4093, 5007
Cotton 50 wt: 2540, 2535, 1148 (which I also used as my bobbin thread throughout)
Now that I knew I wanted to use a variety of threads, to add in more purples and teals, and to play with the spacing, I decided it was safe to dive into quilting the quilt top!
Step 4: Baste and Quilt!
Before jumping into basting my quilt top, I laid down the vertical plaid lines with painter’s tape. Once I had those in place, I started basting around it.
Since I knew there would be a lot of thread changes, I decided to sew each thread color all at once before switching to the next. In order to remove my painter’s tape marks and my basting pins as soon as I could, I decided that my light turquoise thread would act as my anchor for the rest of the design and I quilted that grid first. Once I had my “anchor threads” in place, I got to it and started building my plaid!
Using my samples as a jumping off point, I knew that I wanted to play more with the spacing between the different colors and add in some different thread weights for good measure. Every time I had a thread change, I would lay down a little bit of the upcoming threads to get a sense of the color balance and overall pattern and would adjust as I saw fit. I tried hard not to overthink it!
As I quilted, I didn’t stress too much about being exact: I intentionally let the quilting lines wander and wobble a bit. After seeing the movement in the hand drawn and painted plaid that I discovered on Pinterest, I knew I wanted to capture a similar “hand drawn” feel. So, I decided that after marking the original “anchor threads”, I wouldn’t mark any other lines. Instead, I use the marks on my presser foot as a visual guide.
Step 5: Bind, Step Back, and Admire
After finishing up my all over plaid pattern, I squared up the quilt top and added my binding. I’m so thrilled with how it turned out: from start to finish it took almost no time at all (well, no time in terms of quilt time). Now I want to try my other plaid patterns: maybe I’ll add in a couple more thread weights or mix in some hand quilting stitches or skip the machine quilting and do just hand quilt it. Even with a basic grid structure, the sky's the limit!

You May Also Enjoy These Quilting Tips and Guides:


